本文我们将依次从React元素、JSX语法、虚拟DOM、Component组件以及生命周期方法等方面,逐步深入了解React内部实现原理。
1. React元素
React元素用于描述真实的DOM组件或者自定义组件。
(1). React元素的定义
一个普通的React元素有两个属性:type和props。其中type为组件名称,对应着DOM元素类型(div、p...)或者自定义组件类型;props为组件属性,组件可以有一个children的数组特殊属性,数组中的每一个元素都是一个React元素。这样我们就可以通过React元素来描述组件之间的层级关系了。比如,如下React元素:
const element = {
  type: "div",
  props: {
    id: "container",
    children: [
      { type: "a", props: { href: "/bar" } },
      { type: "span", props: {} }
    ]
  }
};
描述了如下DOM:
<div id="container">
  <a href="/bar"></a>
  <span></span>
</div>
对于Text元素,我们将其元素type设置为“TEXT ELEMENT”,以方便特殊处理。比如:
const element =     {
        type: "TEXT ELEMENT",
        props: { nodeValue: "Foo" }
    }
描述了:
<Text>Foo</Text>
(2). 渲染React元素到浏览器
首先,我们要模仿ReactDom.render方法: 接收一个元素和一个DOM容器,从而将元素描述的UI层次结构,渲染到浏览器的DOM容器中。
function render(element, parentDOM) {
    //获取元素的类型与属性信息
    const { type, props } = element;

    //需要对Text类型元素做特殊处理
    const isTextElement = type === "TEXT ELEMENT";


    //调用浏览器API创建相应的DOM
    const dom = isTextElement
        ? document.createTextNode("")
        : document.createElement(type);

    //处理DOM上的事件监听,以on开头的属性为事件handler属性
    const isListener = name => name.startsWith("on");

    //调用浏览器API添加DOM事件处理函数
    Object.keys(props).filter(isListener).forEach(name => {
        const eventType = name.toLowerCase().substring(2); // 取两位后
        dom.addEventListener(eventType, props[name]);
    });

    //处理DOM上的普通属性
    const isAttribute = name => !isListener(name) && name != "children";
    Object.keys(props).filter(isAttribute).forEach(name => {
        dom[name] = props[name];
    });

    //处理React element上的特殊属性children
    const childElements = props.children || [];

    //递归的渲染每一个React元素
    childElements.forEach(childElement => render(childElement, dom));
    parentDOM.appendChild(dom);
}
到这里为止,我们就成功的创建了一个render函数,它可以将React Element描述的DOM层级结构,渲染到浏览器中。通过jsbin运行我们刚刚完成的代码:https://jsbin.com/tilaxucazi/1/edit?js,output
2. JSX语法
仅仅使用React Element来描述复杂的层级结构是非常困难的;本小结,我们使用JSX来简化对UI层级结构的描述,并使用Babel将JSX描述的层级结构 转换为React Element。对于上一节jsbin演示中的复杂的元素描述代码:
const element = {
    type: "div",
    props: {
        id: "container",
        children: [
            {
                type: "span",
                props: {
                    children: [
                        {
                            type: "TEXT ELEMENT",
                            props: { nodeValue: "Foo" }
                        }
                    ]
                }
            },
            {
                type: "a",
                props: {
                    href: "/bar", children: [
                        {
                            type: "TEXT ELEMENT",
                            props: { nodeValue: "bar" }
                        }
                    ]
                },
            }
        ]
    }
};
我们可以使用如下简练的JSX语法即可描述:
const element = (
  <div id="container">
    <span>Foo</span>
    <a href="/bar">bar</a>
  </div>
);
JSX作为一种语法糖,极大的提升了我们描述复杂界面的效率,Babel则负责将JSX转换为React Element。为了使用Babel的魔法能力,我们需要提供一个createElement函数:
function createElement(type, config, ...args) {
  const props = Object.assign({}, config);
  const hasChildren = args.length > 0;
  const rawChildren = hasChildren ? [].concat(...args) : [];
  props.children = rawChildren
    .filter(c => c != null && c !== false)
    .map(c => c instanceof Object ? c : createTextElement(c));
    // 过滤-空-值, 剩下的-不属于-Object的值 -> createTextElement -> 变为 类型为TEXT_ELEMENT- Didact元素
  return { type, props };
}

function createTextElement(value) {
  // 规范数据
  return createElement("TEXT ELEMENT", { nodeValue: value });
}
Babel会将JSX语法转换成对createElement函数的调用:
从而创建复杂的React Element层次结构。
到这里为止,我们就成功地借助于Babel,使用JSX语法来描述React Element的层级结构了:。通过jsbin运行我们刚刚完成的代码,体验一下JSX的魔力:https://jsbin.com/dinefeqiki/1/edit?js,output
Babel会使用文件头中的注释来决定"构造Element的函数"的名称:/** @jsx createElement /,本文式例中,我们使用createElement。如果文件头中没有/* @jsx */注释,则默认使用React.createElement。
3. 虚拟DOM
虚拟DOM是对真实DOM的抽象,通过对比虚拟DOM,准确的找出需要对真实DOM进行的操作,以最小的复杂度更新真实DOM。这个过程也在称为(Reconciliation)[https://reactjs.org/docs/reconciliation.html]。
为了便于组织虚拟DOM和真实DOM的关系,需要引入Instance的概念。一个Instance有3个属性
instance = {
    element: {},            //React元素的引用
    dom: {},                //真实浏览器DOM的引用
    childInstances: []      //子节点的Instance引用
}
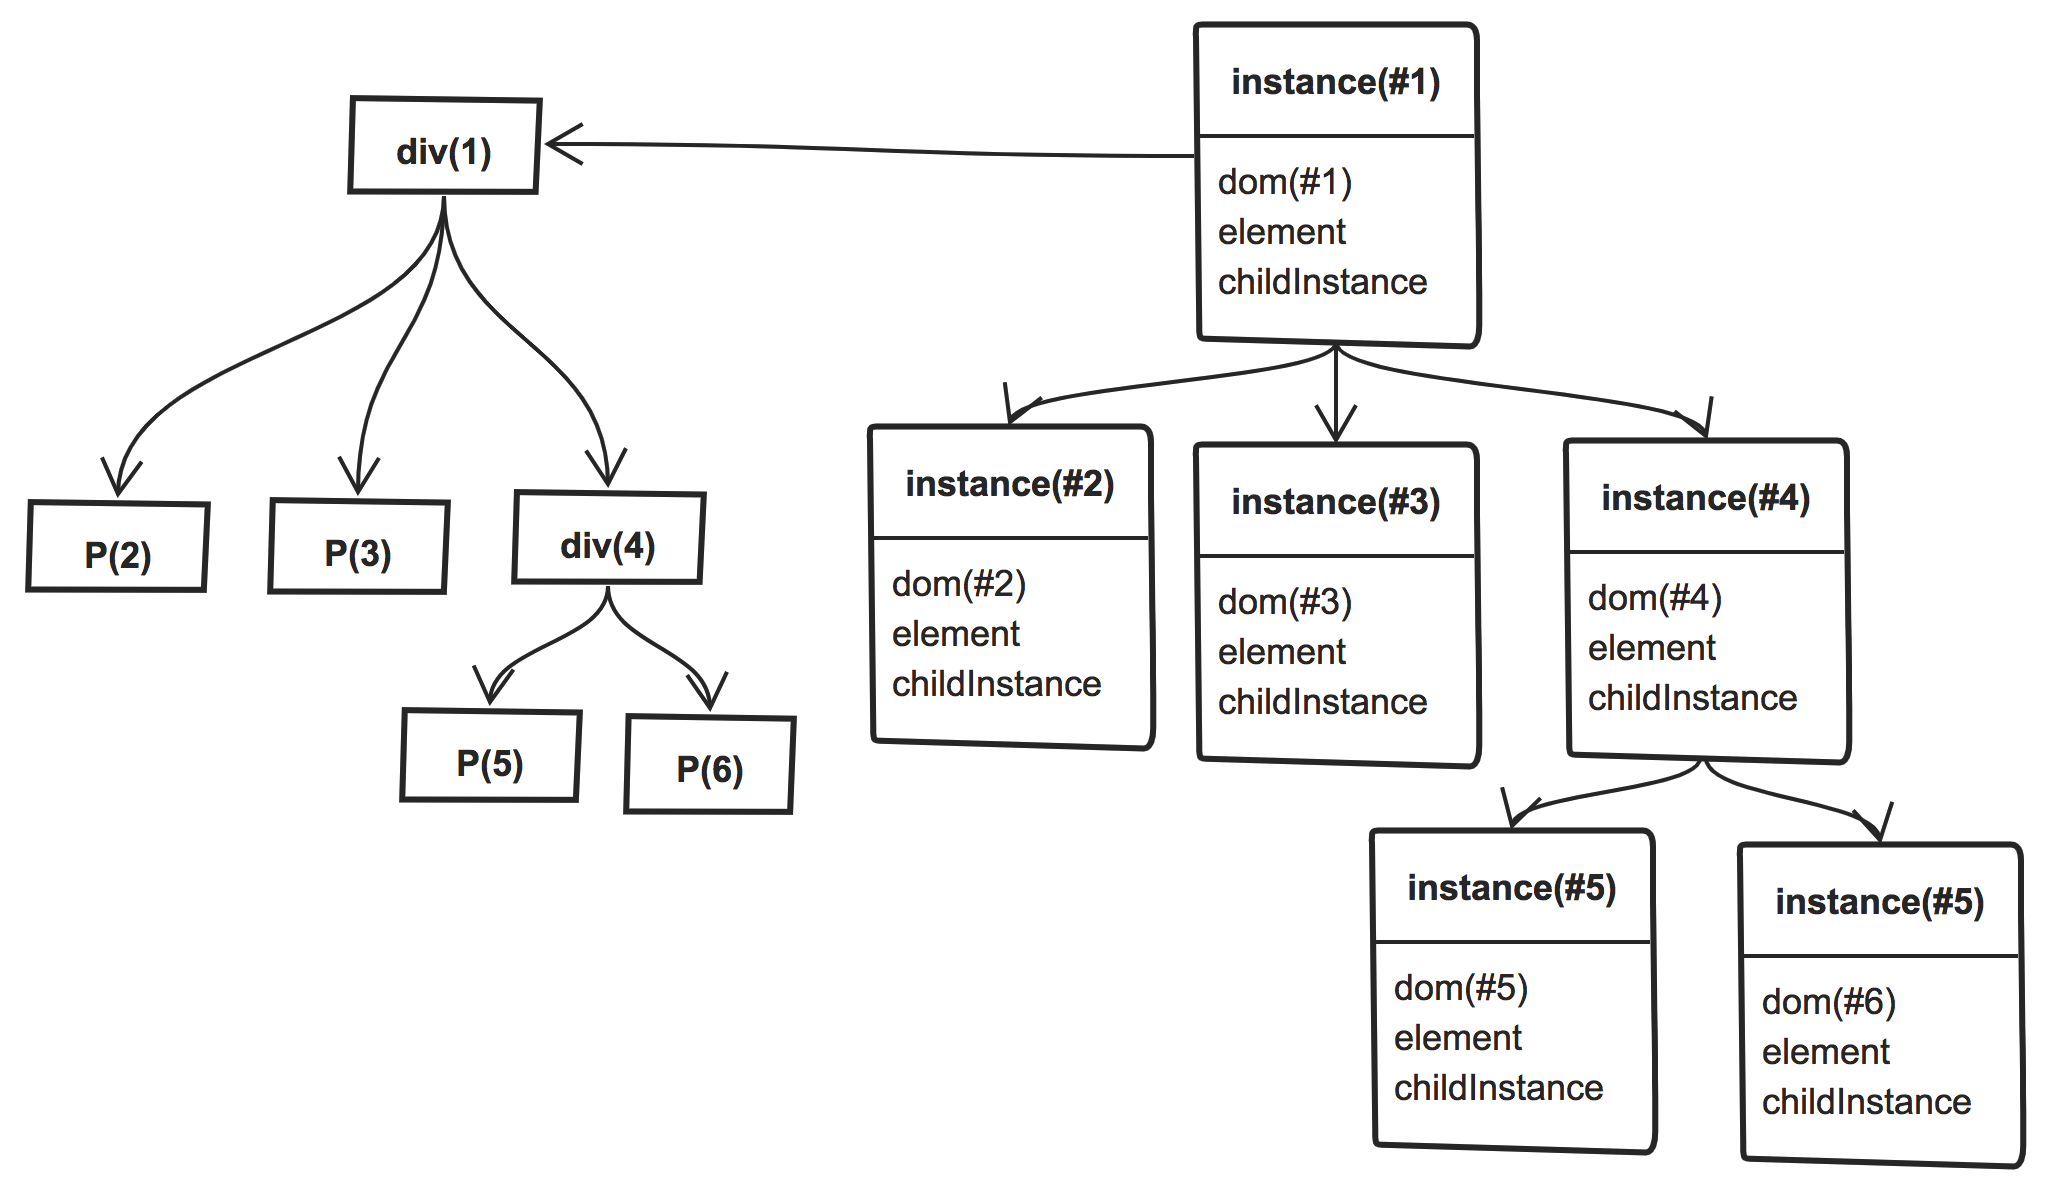
每个真实DOM节点都会有一个匹配的虚拟DOM节点:Instance。通过维护Instance和真实DOM节点的一一对应关系(如下图所示),我们就可以进行对虚拟DOM进行对比,来最小化的更新真实DOM。
虚拟DOM对比算法的一个目标是尽可能避免-创建或删除Instance。创建和删除Instance意味着我们也将修改DOM树,所以我们重新利用Instance的次数越多,修改DOM树的次数就越少。引入虚拟DOM后,我们需要对前两节中的代码结构,进行大幅调整。
(1). render函数
引入虚拟DOM后,render函数的主要作用是:调用reconcile函数,进行DOM diff,和真实DOM更新。
//表示根节点的instance
let rootInstance = null;

function render(element, container) {
  const prevInstance = rootInstance; //虚拟DOM的根节点
  const nextInstance = reconcile(container, prevInstance, element); //对比DOM diff,并更新真实DOM
  rootInstance = nextInstance; // 新的虚拟DOM根节点
}
(2). reconcile函数
reconile函数会使用React element元素创建虚拟DOM,并根据需要,对真实DOM进行最小化更新操作。该函数是React实现中最复杂的函数,我们将它拆分为两个子个函数分别实现。
function reconcile(parentDom, instance, element) {
  if (instance == null) {
    //虚拟的根节点为空时,使用当前React元素,创建新的虚拟DOM
    const newInstance = instantiate(element);
    //将真实DOM插入容器
    parentDom.appendChild(newInstance.dom);
    return newInstance;
  }else if(element == null){
    //删除DOM
    parentDom.removeChild(instance.dom);
    return null;
  } if (instance.element.type === element.type) {
    //原有虚拟DOM节点类型与要创建的DOM节点类型一致时,可以重用dom以提升性能,只需要更新dom节点属性
    updateDomProperties(instance.dom, instance.element.props, element.props);
    //对instance子节点进行对比,以保证尽可能的重用DOM
    instance.childInstances = reconcileChildren(instance, element);
    instance.element = element;
    return instance;
  } else {
    //使用当前React元素,创建新的虚拟DOM
    const newInstance = instantiate(element);
    //将真实DOM替换容器中的原有DOM
    parentDom.replaceChild(newInstance.dom, instance.dom);
    return newInstance;
  }
}
(3). reconcileChildren函数
在真实的React实现中,需要元素提空额外属性(key)来匹配,以提升diff的效率。本文我们实现一个简版的diff算法,只比较children数组中相同位置的子节点。
function reconcileChildren(instance, element) {
  // instance 旧
  // element 新
  const dom = instance.dom;
  const childInstances = instance.childInstances;
  const nextChildElements = element.props.children || [];
  const newChildInstances = []; // 新的孩子数组

  //选取新旧子节点数据组中最大的值
  const count = Math.max(childInstances.length, nextChildElements.length);

  for (let i = 0; i < count; i++) {
    const childInstance = childInstances[i];
    const childElement = nextChildElements[i];
    //调用reconcile创建子节点的虚拟DOM
    /*这里存在三种情况:
     * (1). childInstance和childElement都存在,则调用reconcile进行diff操作
     * (2). childInstance为空而childElement存在,调用调用reconcile创建新的instance
     * (3). childInstance存在而childElement为空,则调用reconcile进行删除操作,此时会返回null
     */
    const newChildInstance = reconcile(dom, childInstance, childElement);
    newChildInstances.push(newChildInstance);
  }
   return newChildInstances.filter(instance => instance != null); //过滤null
}
(4). instantiate函数
instance函数是React实现中最关键的函数,它的作用是递归地创建、更新虚拟DOM。
function instantiate(element) {
  const { type, props } = element;

  const isTextElement = type === "TEXT ELEMENT";
  const dom = isTextElement
    ? document.createTextNode("")
    : document.createElement(type);

  updateDomProperties(dom, [], props); //更新DOM节点的属性、绑定事件

  //递归地调用instantiate函数,创建虚拟DOM的子节点
  const childElements = props.children || [];
  const childInstances = childElements.map(instantiate);
  const childDoms = childInstances.map(childInstance => childInstance.dom);
  childDoms.forEach(childDom => dom.appendChild(childDom));

  const instance = { dom, element, childInstances };
  return instance;
}
(5). updateDomProperties函数
updateDomProperties函数是调用浏览器DOM api对DOM进行修改的函数。该函数,首先从dom节点中删除所有旧属性,然后添加所有新属性。
function updateDomProperties(dom, prevProps, nextProps) {

  //判断是否为事件属性
  const isEvent = name => name.startsWith("on");
  //判断是否为普通属性
  const isAttribute = name => !isEvent(name) && name != "children";


  //移除原有DOM节点上绑定的事件
  Object.keys(prevProps).filter(isEvent).forEach(name => {
    const eventType = name.toLowerCase().substring(2);
    dom.removeEventListener(eventType, prevProps[name]);
  });

  //移除原有DOM节点的普通属性
  Object.keys(prevProps).filter(isAttribute).forEach(name => {
    dom[name] = null;
  });

  //添加新属性
  Object.keys(nextProps).filter(isAttribute).forEach(name => {
    dom[name] = nextProps[name];
  });

  //添加新事件
  Object.keys(nextProps).filter(isEvent).forEach(name => {
    const eventType = name.toLowerCase().substring(2);
    dom.addEventListener(eventType, nextProps[name]);
  });
}
到目前为止,我们将上一节的render函数,拆分为5个功能独立的子函数,以增强了React的能力,可以重用DOM节点来避免对DOM树的大部分更改。重用DOM也有保持内部状态(如滚动位置或焦点)的作用。
https://jsbin.com/tacazovuqo/1/edit?js,output
4. Component组件
上文第三节中我们实现了基本的虚拟DOM比较,能够在一定程度上复用DOM,但仍然有如下问题:
(1)每次更改都会触发整棵虚拟DOM树的比较

(2)需要显式的调用render函数,来渲染最新状态

(3)不支持自定义组件
本节我们引入Component组件来解决这些问题。在上节中,为了便于组织虚拟DOM和真实DOM的关系,我们引入了Instance;它有三个属性,分别是React元素的引用、真实DOM的引用、子节点Instance数组的引用。
instance = {
    element: {},            //React元素的引用
    dom: {},                //真实浏览器DOM的引用
    childInstances: []      //子节点的Instance引用
}
而本节引入Component后,我们需要对Instance进行调整,新增了publicInstance,来表示对Component实例的引用;而一个Component实例内部又有一个对它自身Instance的引用:internalInstance。internalInstance的作用是为了在组件内部拿到子虚拟DOM的根节点,从而进行子树的diff操作,避免整个虚拟DOM进行diff操作。
instance = {
    element: {},            //React元素的引用
    dom: {},                //真实浏览器DOM的引用
  childInstances: [],       //子节点的Instance引用
  publicInstance: {  //表示Component的引用
    __internalInstance: {} //对自身instance的引用, 用于在setState时通过组件this拿到instance以触发更新
  }
}
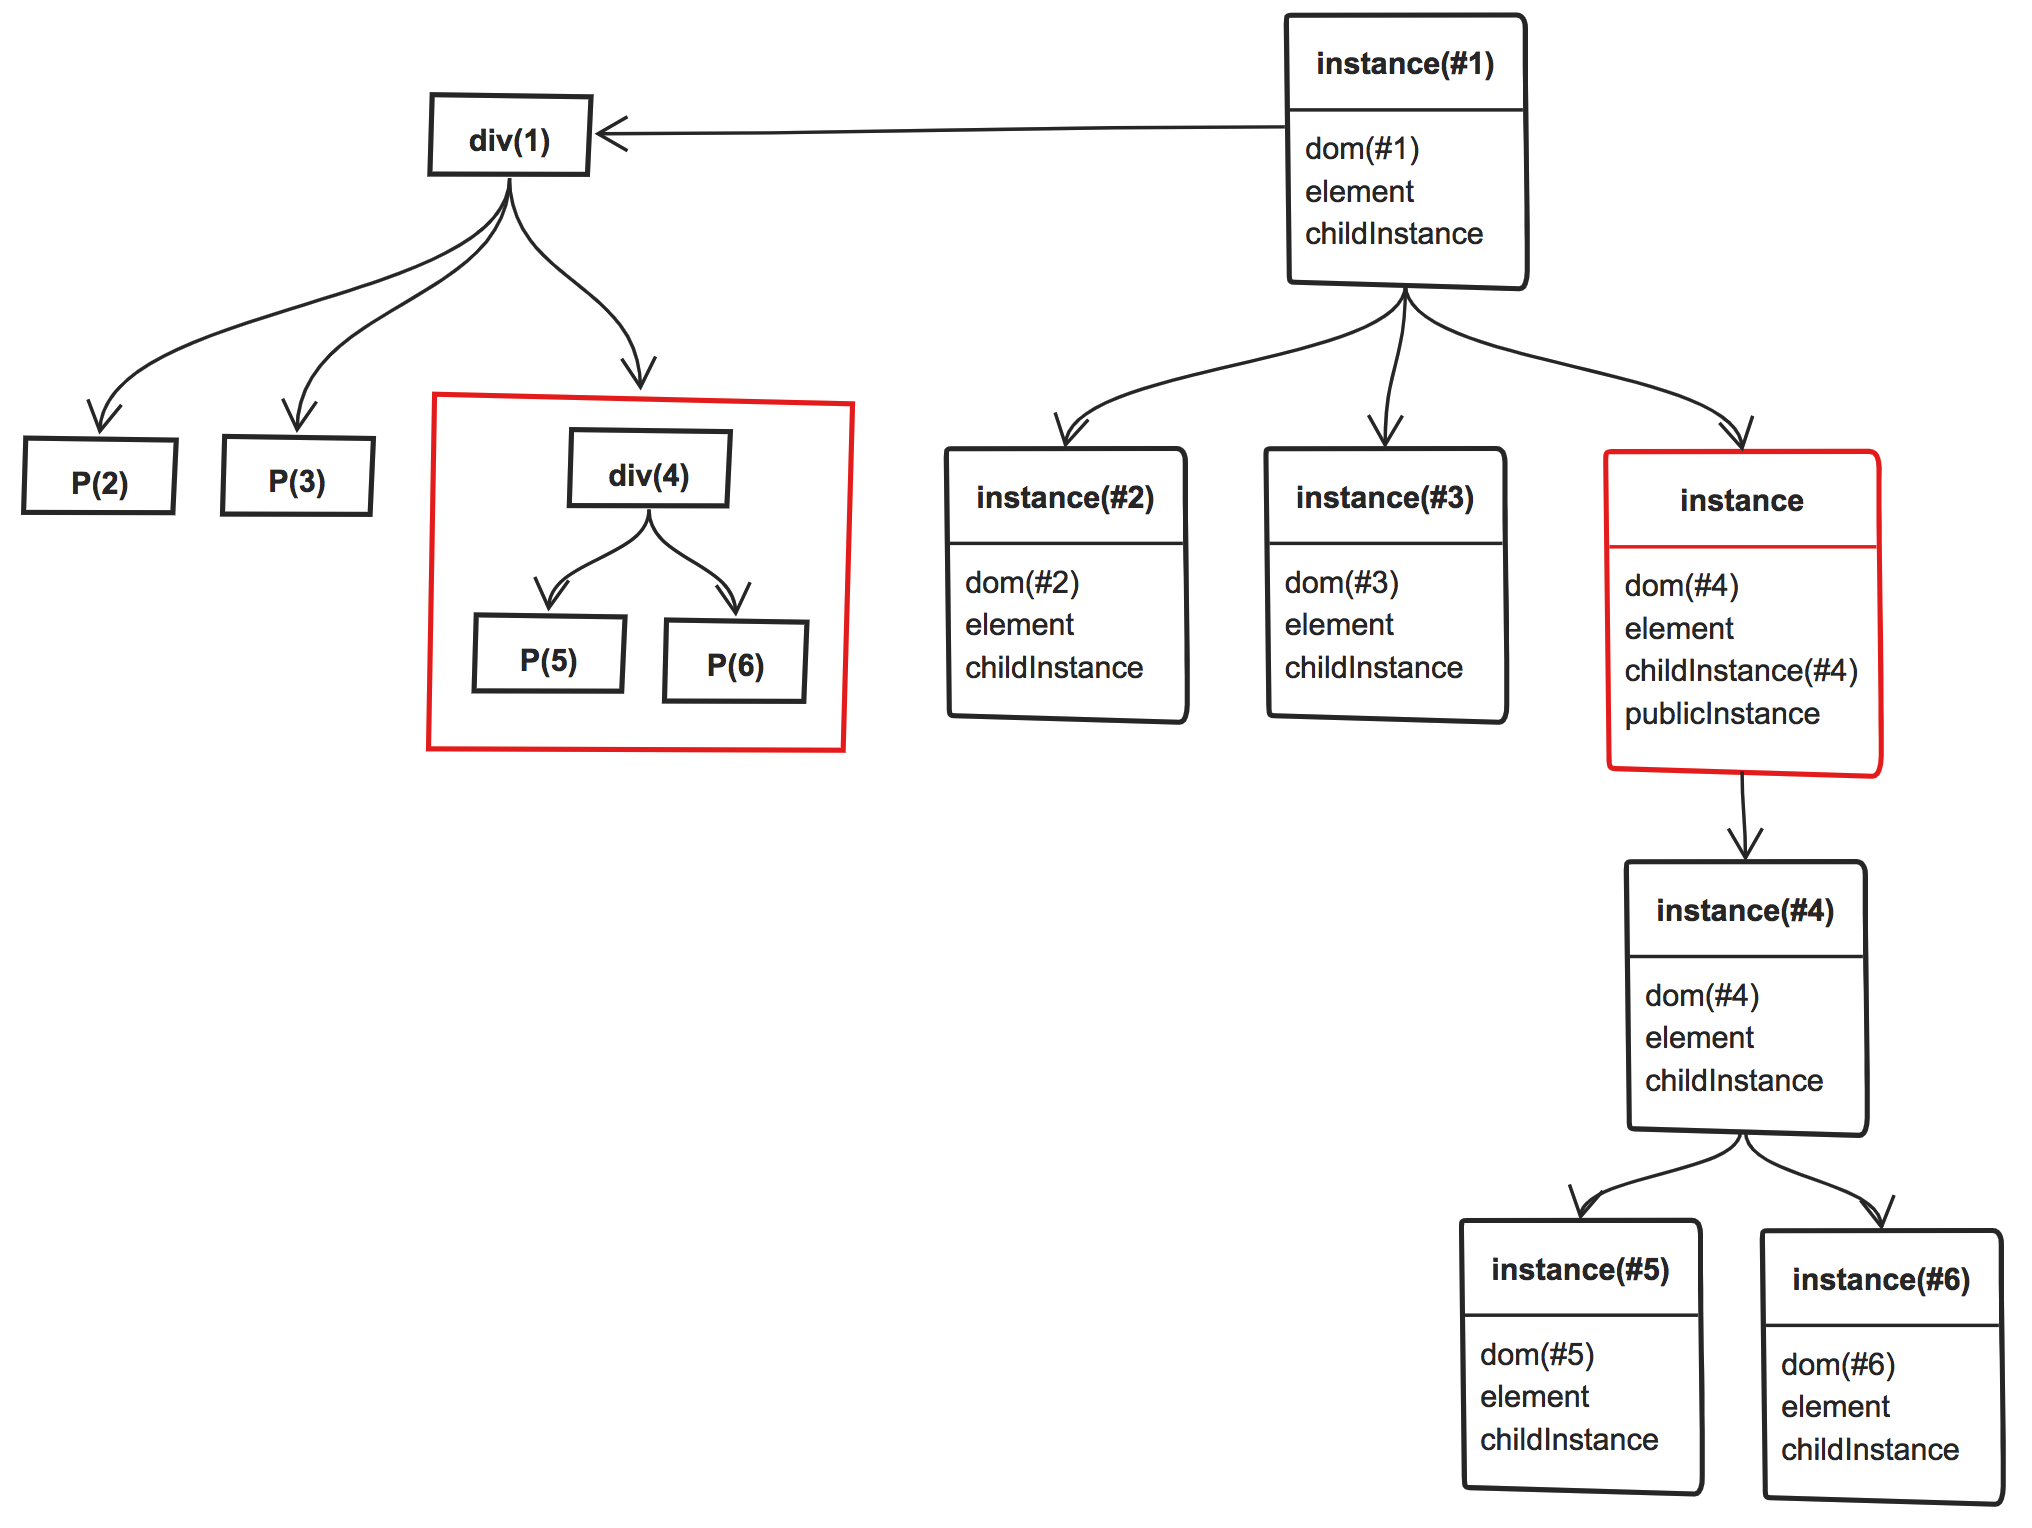
相应的,引入Component后,虚拟DOM节点和真实DOM节点的对应关系也有变化:普通instance节点依然一一对应着真实DOM节点,而自定义组件的instance节点则对应着子树根节点对应的真实DOM。如下图红框所示为自定义组件:
引入Component后, React的element可能是一个自定义的组件, 我们需要一个用于创建自定义组件Component实例(publicInstance)的方法:
function createPublicInstance(element, internalInstance) {
  // 当元素进到这里来, 说明type是个自定义element的构造函数
  const { type, props } = element;
  // 调用组件的构造函数,创建组件实例
  const publicInstance = new type(props);
  // 自定义组件对应的Instance引用, 用于在实例中通过this.__internalInstance获取组件对应的instance,以更新组件
  publicInstance.__internalInstance = internalInstance;
  return publicInstance;
}
所有的React组件都需要继承一个基类Component,该基类有一个构造函数和setState方法,其中setState方法会触发组件的更新
class Component {
  constructor(props) {
    this.props = props;
    this.state = this.state || {};
  }

  //用于更新组件的内部状态
  setState(partialState) {
    this.state = Object.assign({}, this.state, partialState);
    // 通过this.__internalInstance获取Component对应的instance,并通过updateInstance进行更新
    updateInstance(this.__internalInstance);
  }
}

function updateInstance(internalInstance) {
  //internalInstance是自定义组件对应的instance {element, dom, childInstances}
  const parentDom = internalInstance.dom.parentNode;
  const element = internalInstance.element;
  //调用reconile函数,进行虚拟DOM比较,并更新DOM树
  reconcile(parentDom, internalInstance, element);
}
我们需要更新上一节实现的reconcile函数,以实现对自定义组件(Component)的支持:
function reconcile(parentDom, instance, element) {
  if (instance == null) {
    //虚拟的根节点为空时,使用当前React元素,创建新的虚拟DOM
    const newInstance = instantiate(element);
    //将真实DOM插入容器
    parentDom.appendChild(newInstance.dom);
    return newInstance;
  }else if(element == null){
    //删除DOM
    parentDom.removeChild(instance.dom);
    return null;
  }  else if(instance.element.type !== element.type){
    //使用当前React元素,创建新的虚拟DOM
    const newInstance = instantiate(element);
    //将真实DOM替换容器中的原有DOM
    parentDom.replaceChild(newInstance.dom, instance.dom);
    return newInstance;
  } else if (typeof element.type === 'string') {
    //原有虚拟DOM节点类型与要创建的DOM节点类型一致且为原生类型(非自定义类型),可以重用dom以提升性能,只需要更新dom节点属性
    updateDomProperties(instance.dom, instance.element.props, element.props);
    //对instance子节点进行对比,以保证尽可能的重用DOM
    instance.childInstances = reconcileChildren(instance, element);
    instance.element = element;
    return instance;
  } else {
    //逻辑到之有两个条件
    //(1)原有虚拟DOM节点类型与要创建的DOM节点类型一致
    //(2)element type为自定义类型,其中publicInstance是自定义组件的实例
    //更新自定义组件的属性
    instance.publicInstance.props = element.props;
    //原有孩子节点instance数组
    const oldChildInstance = instance.childInstance;
    //调用自定义的render函数,创建自定义组件的孩子节点element
    const childElement = instance.publicInstance.render(); // 组件的render函数
    //对比自定义组件的虚拟DOM,更新DOM
    const childInstance = reconcile(parentDom, oldChildInstance, childElement);
    //更新instance引用
    instance.dom = childInstance.dom;
    instance.childInstance = childInstance;
    instance.element = element;
    return instance;
  }
}
instantiate函数的作用是将element转成为instance结构,它也需要额外的修改以支持自定义组件。在instantiate函数中,对于DOM类型的组件,我们需要调用document.createElement,而 对于自定义的组件,则需要调用createPublicInstance。
function instantiate(element) {
  const { type, props } = element;
  const isDomElement = typeof type === 'string';

  if(isDomElement) {
    const isTextElement = type === "TEXT ELEMENT";
    const dom = isTextElement
      ? document.createTextNode("")
      : document.createElement(type);

    updateDomProperties(dom, [], props); //更新DOM节点的属性、绑定事件

    //递归地调用instantiate函数,创建虚拟DOM的子节点
    const childElements = props.children || [];
    const childInstances = childElements.map(instantiate);
    const childDoms = childInstances.map(childInstance => childInstance.dom);
    childDoms.forEach(childDom => dom.appendChild(childDom));

    const instance = { dom, element, childInstances };
    return instance;
  }else {
    const instance = {};
    //对于自定义类组件,创建对应的publicInstance
    const publicInstance = createPublicInstance(element, instance);
    //调用自定义组件的render方法,获取child element
    const childElement = publicInstance.render();
    //创建child element的instance
    const childInstance = instantiate(childElement); // 递归 孩子拿到 { dom, element, childInstances }
    const dom = childInstance.dom;
    //返回自定义类型组件的instance,其中publicInstance为自定义组件的实例
    //自定义组件的instance有几个特殊的地方:
    //(1) childInstance不是数组,而是自定义组件的根节点对应的instance
    //(2) dom是自定义组件的根节点对应的DOM
    //(3) publicInstance是自定义组件类实例,内部维护着__internalInstance指向instance
    Object.assign(instance, { dom, element, childInstance, publicInstance });
    return instance;
  }
}
目前为止,我们已经可以使用Component自定义组件,并且在更新组件内部状态时自动触发子树的重新渲染。 https://jsbin.com/xumixem/1/edit?js,output